Running the game: Difference between revisions
(Created page with "==System requirements== {| class="wikitable" |+ ! !Minimum !Recommended |- !Operating System | colspan="2" |<div style="text-align: center;">Windows 7, 8, or Windows 10 (32 or...") |
(Marked this version for translation) |
||
| (28 intermediate revisions by 2 users not shown) | |||
| Line 1: | Line 1: | ||
==System requirements== | <translate> | ||
<!--T:1--> | |||
Various information on how to install and run the game. | |||
</translate> | |||
<translate> | |||
== System requirements== <!--T:2--> | |||
</translate> | |||
{| class="wikitable" | {| class="wikitable" | ||
|+ | |+ | ||
! | ! | ||
!Minimum | !<translate><!--T:3--> Minimum</translate> | ||
!Recommended | !<translate><!--T:4--> Recommended</translate> | ||
|- | |- | ||
!Operating System | !<translate><!--T:5--> Operating System</translate> | ||
| | |<translate><!--T:6--> Windows 7, 8, 10 (32 or 64 bit), or Windows 11</translate><ref><translate><!--T:7--> Operating systems other than Windows are not officially supported, but the game may still run on Mac OS X or older Windows systems with some additional setup.</translate></ref> | ||
<translate><!--T:58--> Linux (Wine)</translate><ref><translate><!--T:59--> Linux support is experimental. See [[Special:MyLanguage/Running the game on Linux|Running the game on Linux]] for more information.</translate></ref> | |||
|<translate><!--T:60--> Windows 10 (32 or 64 bit), or Windows 11</translate> | |||
|- | |- | ||
!Processor | !<translate><!--T:8--> Processor</translate> | ||
|1.6 GHz processor | |<translate><!--T:9--> 1.6 GHz processor</translate> | ||
Supporting SSE2 instruction set or higher | <translate><!--T:10--> Supporting [[wikipedia:SSE2|SSE2]] instruction set or higher</translate> | ||
|3 GHz multi-core processor | |<translate><!--T:11--> 3 GHz multi-core processor</translate> | ||
Supporting SSE2 instruction set or higher | <translate><!--T:12--> Supporting SSE2 instruction set or higher</translate> | ||
|- | |- | ||
!Memory | !<translate><!--T:13--> Memory</translate> | ||
| | |<translate><!--T:14--> 2 GB</translate> | ||
|4 GB or more | |<translate><!--T:15--> 4 GB or more</translate> | ||
|- | |- | ||
!Graphics | !<translate><!--T:16--> Graphics</translate> | ||
|128 MB | |<translate><!--T:17--> 128 MB</translate> | ||
DirectX 9.0c compatible | <translate><!--T:18--> [[wikipedia:DirectX|DirectX 9.0c]] compatible</translate> | ||
Shader | <translate><!--T:19--> [[wikipedia:High-Level_Shading_Language#Shader_model_comparison|Shader Model 2.0b]] compatible</translate> | ||
|NVIDIA® GeForce® GTX 670 2GB or better | | <translate><!--T:20--> NVIDIA® GeForce® GTX 670 2GB or better</translate> | ||
AMD Radeon R9 280 or better | <translate><!--T:21--> AMD Radeon R9 280 or better</translate> | ||
|- | |- | ||
!Storage | !<translate><!--T:22--> Storage</translate> | ||
|4 GB free space | |<translate><!--T:23--> 4 GB free space</translate> | ||
|6 GB free space | |<translate><!--T:24--> 6 GB free space</translate> | ||
|- | |- | ||
!Display | !<translate><!--T:25--> Display</translate> | ||
|1024×768 resolution | |<translate><!--T:26--> 1024×768 resolution</translate> | ||
|1920×1080 | |<translate><!--T:27--> 1920×1080 or higher, preferably high DPI</translate><ref><translate><!--T:61--> UI scaling is available. High-DPI monitors are supported and recommended, as currently this is the only way of achieving smoother fonts in the game UI.</translate></ref> | ||
60 Hz refresh rate or more | <translate><!--T:28--> 60 Hz refresh rate or more</translate> | ||
|- | |- | ||
!Network | !<translate><!--T:29--> Network</translate> | ||
| colspan="2" |<div style="text-align: center;">Broadband internet connection</div> | | colspan="2" |<div style="text-align: center;"><translate><!--T:30--> Broadband internet connection</translate></div> | ||
|- | |- | ||
!Input | !<translate><!--T:31--> Input</translate> | ||
| colspan="2" |<div style="text-align: center;">Keyboard and mouse</div> | | colspan="2" |<div style="text-align: center;"><translate><!--T:32--> Keyboard and mouse</translate></div> | ||
<div style="text-align: center;"><translate><!--T:62--> Partial controller support</translate><ref><translate><!--T:63--> Mouse is still required for a lot of operations like inventory management or clicking on active objects. See the [https://forum.ymirheim.org/t/2025-08-02-experimental-controller-support/2411 forum post] for more information.</translate></ref></div> | |||
|} | |} | ||
'''Note''': You may have to lower your game's graphics settings to achieve desired performance. | <translate><!--T:33--> '''Note''': You may have to lower your game's graphics settings to achieve desired performance.</translate> | ||
<translate><!--T:34--> '''Note''': The game may still run on systems that have sub-minimum specs, but some additional setup may be required and the performance may be not acceptable.</translate> | |||
<references /> | |||
<translate> | |||
== Installing the game == <!--T:35--> | |||
<!--T:54--> | |||
{{Alert|type=warning|content='''Warning!''' Ymirheim project works as a [[wikipedia:Video_game_modding|mod]] to the original game and can't function without it.<br/>Ymirheim project '''does not''' distribute the original game made by Gravity Co., Ltd., because it can violate the copyright law.<br/>You have to own your copy of the original game in order to install our mod and play on our server.<br/>Alternatively, you can ask your friends or other players to share their client with you, but we don’t have the rights to assist you with that, sorry.}} | |||
<!--T:36--> | |||
[[File:YmirheimLauncher GameInstallationWizard 1.png|thumb]] | |||
[[File:YmirheimLauncher GameInstallationWizard 2.png|thumb]] | |||
<!--T:37--> | |||
To install the game, please follow this procedure: | |||
<!--T:38--> | |||
# Make sure that you have the files of the original game client. Any version of the Korean OBT client (for example, the latest version, “'''kRO2 Client v126'''”) should be perfectly fine.<br />'''Note''': If you've modified your client previously to connect to other private servers (e.g. DiviniaRO2, YggRO2), please be aware that it may not be accepted by Ymirheim Launcher, although most players report that it worked fine for them.<br />In any case, Ymirheim Launcher will made sure that the client is valid before using it so if the installation went without any errors, you're good to go. | |||
# Download the Ymirheim Launcher setup file, save it anywhere on your computer and run it. It's just an installer that will extract the launcher into your system properly (default installation path is <code>%LOCALAPPDATA%\YmirheimLauncher</code><ref><code>%LOCALAPPDATA%</code> is usually located at <code>C:\Users\USERNAME\AppData\Local</code>.</ref>).<br />After the installation is done, you can delete the setup file and use the shortcuts on your desktop or the start menu to launch the game. | |||
# Follow the setup instructions of Ymirheim Launcher: | |||
## Select the folder that contains your original game client; | |||
## Select the folder where you wish your game to be installed (it will be your main game client folder used to play on Ymirheim servers); | |||
## Ymirheim Launcher will use the original game client files, patch them, and place the resulting files into the target directory that you selected. After the patching finishes, the launcher will update the game to the latest version and will let you start the game. | |||
<!--T:39--> | |||
{{Clear}} | |||
== Selecting the game UI language and theme == <!--T:40--> | |||
<!--T:41--> | |||
[[File:YmirheimLauncher GameOptions 1.png|thumb]] | |||
<!--T:55--> | |||
The first time you launch the game, the launcher will ask you to choose the language and the UI theme for the game client. | |||
<!--T:42--> | |||
These settings can then be changed in the "'''Game Options'''" menu, which opens by clicking the gear-shaped button in the upper right corner of the Ymirheim Launcher interface. | |||
<!--T:43--> | |||
Currently, only two UI skins are supported: “Default” and “Gears”: | |||
# '''Default''' is the usual “transparent” theme that was in the latest version of the original game, introduced in May 2008. | |||
# '''Gears''' is a modified version, a tribute to the UI of the older version of the game (before May 2008). | |||
<!--T:44--> | |||
<gallery mode="packed"> | |||
File:Game UI Skin Default.png|Default UI Skin | |||
File:Game UI Skin Gears.png|Gears UI Skin | |||
</gallery> | |||
== Safe Mode (Minimal settings) == <!--T:45--> | |||
<!--T:56--> | |||
If your game client doesn't start or you're having trouble starting it with the default settings, you can start it in the safe mode. | |||
<!--T:46--> | |||
Safe mode will set all your graphics options to minimal, the game will run in windowed mode 1024×768 without any shaders. This may help you to get to the graphics settings and set them to your liking. | |||
<!--T:47--> | |||
To start the game in safe mode, you need to go to the "'''Game Options'''" menu, which opens when you click the gear-shaped button in the upper right corner of the Ymirheim Launcher interface, and select the "'''Start the game in safe mode'''" item in this menu. Click “OK” and start the game. This option will be reset back to normal as soon as you close the launcher. | |||
<!--T:48--> | |||
'''Note''': Safe mode doesn't reset some character-related settings. If you wish to do so, you can delete all the files in the <code>Documents\My Games\Ymirheim\Option</code><ref>Your <code>Documents</code> folder is usually located at <code>C:\Users\USERNAME\Documents</code>.</ref> folder. | |||
== Troubleshooting == <!--T:49--> | |||
{{IncompleteSection}} | |||
=== File "System/RagII.exe" not found === <!--T:50--> | |||
<!--T:57--> | |||
If you see an error message saying that the RagII.exe file or any DLL file is missing, it usually means that your anti-virus software placed it in the quarantine. | |||
' | <!--T:51--> | ||
We receive a lot of reports about false positives from our users (mostly from Windows Defender users) and we're working on multiple solutions to minimize the amount of false-positives. But for now, if you found out that your anti-virus placed one of the game files into the quarantine, you can: | |||
<!--T:52--> | |||
* Add the game folder to the exceptions of your anti-virus software. | |||
** Find the path to the game directory in the "'''Game Options'''" menu, which opens by clicking the gear-shaped button in the upper right corner of the Ymirheim Launcher interface. | |||
** Add the directory to the exclusions of your anti-virus software. | |||
*** For Windows Defender, go to your Security Dashboard (right click "Windows Security" icon in the system tray, select "Security Dashboard"), under "Virus & threat protection settings", select "Manage settings", and then under "Exclusions", select "Add or remove exclusions" and select the game folder. | |||
** Additionally you might have to add the launcher's temporary files directory (<code>%APPDATA%\YmirheimLauncher\Temp\System</code><ref><code>%APPDATA%</code> is usually located at <code>C:\Users\USERNAME\AppData\Roaming</code>.</ref>) to the exclusions as well, since it's being used when it downloads the patches. | |||
* Or pick a different anti-virus software. Among popular anti-virus solutions only Windows Defender causes such troubles. | |||
* After that, perform file repair by clicking the "'''Repair Files'''" button in the launcher. | |||
== | == References == <!--T:53--> | ||
<references /> | |||
</translate> | |||
Latest revision as of 08:36, 14 August 2025
Various information on how to install and run the game.
System requirements
| Minimum | Recommended | |
|---|---|---|
| Operating System | Windows 7, 8, 10 (32 or 64 bit), or Windows 11[1]
Linux (Wine)[2] |
Windows 10 (32 or 64 bit), or Windows 11 |
| Processor | 1.6 GHz processor
Supporting SSE2 instruction set or higher |
3 GHz multi-core processor
Supporting SSE2 instruction set or higher |
| Memory | 2 GB | 4 GB or more |
| Graphics | 128 MB
DirectX 9.0c compatible Shader Model 2.0b compatible |
NVIDIA® GeForce® GTX 670 2GB or better
AMD Radeon R9 280 or better |
| Storage | 4 GB free space | 6 GB free space |
| Display | 1024×768 resolution | 1920×1080 or higher, preferably high DPI[3]
60 Hz refresh rate or more |
| Network | Broadband internet connection
| |
| Input | Keyboard and mouse
Partial controller support[4]
| |
Note: You may have to lower your game's graphics settings to achieve desired performance.
Note: The game may still run on systems that have sub-minimum specs, but some additional setup may be required and the performance may be not acceptable.
- ↑ Operating systems other than Windows are not officially supported, but the game may still run on Mac OS X or older Windows systems with some additional setup.
- ↑ Linux support is experimental. See Running the game on Linux for more information.
- ↑ UI scaling is available. High-DPI monitors are supported and recommended, as currently this is the only way of achieving smoother fonts in the game UI.
- ↑ Mouse is still required for a lot of operations like inventory management or clicking on active objects. See the forum post for more information.
Installing the game
Ymirheim project does not distribute the original game made by Gravity Co., Ltd., because it can violate the copyright law.
You have to own your copy of the original game in order to install our mod and play on our server.
Alternatively, you can ask your friends or other players to share their client with you, but we don’t have the rights to assist you with that, sorry.
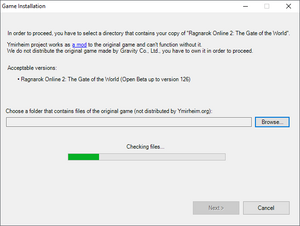
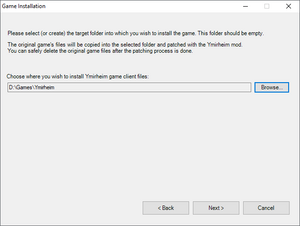
To install the game, please follow this procedure:
- Make sure that you have the files of the original game client. Any version of the Korean OBT client (for example, the latest version, “kRO2 Client v126”) should be perfectly fine.
Note: If you've modified your client previously to connect to other private servers (e.g. DiviniaRO2, YggRO2), please be aware that it may not be accepted by Ymirheim Launcher, although most players report that it worked fine for them.
In any case, Ymirheim Launcher will made sure that the client is valid before using it so if the installation went without any errors, you're good to go. - Download the Ymirheim Launcher setup file, save it anywhere on your computer and run it. It's just an installer that will extract the launcher into your system properly (default installation path is
%LOCALAPPDATA%\YmirheimLauncher[1]).
After the installation is done, you can delete the setup file and use the shortcuts on your desktop or the start menu to launch the game. - Follow the setup instructions of Ymirheim Launcher:
- Select the folder that contains your original game client;
- Select the folder where you wish your game to be installed (it will be your main game client folder used to play on Ymirheim servers);
- Ymirheim Launcher will use the original game client files, patch them, and place the resulting files into the target directory that you selected. After the patching finishes, the launcher will update the game to the latest version and will let you start the game.
Selecting the game UI language and theme
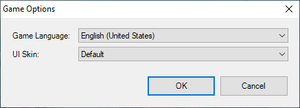
The first time you launch the game, the launcher will ask you to choose the language and the UI theme for the game client.
These settings can then be changed in the "Game Options" menu, which opens by clicking the gear-shaped button in the upper right corner of the Ymirheim Launcher interface.
Currently, only two UI skins are supported: “Default” and “Gears”:
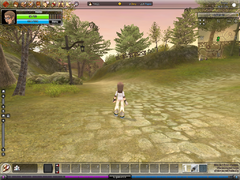
- Default is the usual “transparent” theme that was in the latest version of the original game, introduced in May 2008.
- Gears is a modified version, a tribute to the UI of the older version of the game (before May 2008).
Safe Mode (Minimal settings)
If your game client doesn't start or you're having trouble starting it with the default settings, you can start it in the safe mode.
Safe mode will set all your graphics options to minimal, the game will run in windowed mode 1024×768 without any shaders. This may help you to get to the graphics settings and set them to your liking.
To start the game in safe mode, you need to go to the "Game Options" menu, which opens when you click the gear-shaped button in the upper right corner of the Ymirheim Launcher interface, and select the "Start the game in safe mode" item in this menu. Click “OK” and start the game. This option will be reset back to normal as soon as you close the launcher.
Note: Safe mode doesn't reset some character-related settings. If you wish to do so, you can delete all the files in the Documents\My Games\Ymirheim\Option[2] folder.
Troubleshooting
You can help by adding to it.
File "System/RagII.exe" not found
If you see an error message saying that the RagII.exe file or any DLL file is missing, it usually means that your anti-virus software placed it in the quarantine.
We receive a lot of reports about false positives from our users (mostly from Windows Defender users) and we're working on multiple solutions to minimize the amount of false-positives. But for now, if you found out that your anti-virus placed one of the game files into the quarantine, you can:
- Add the game folder to the exceptions of your anti-virus software.
- Find the path to the game directory in the "Game Options" menu, which opens by clicking the gear-shaped button in the upper right corner of the Ymirheim Launcher interface.
- Add the directory to the exclusions of your anti-virus software.
- For Windows Defender, go to your Security Dashboard (right click "Windows Security" icon in the system tray, select "Security Dashboard"), under "Virus & threat protection settings", select "Manage settings", and then under "Exclusions", select "Add or remove exclusions" and select the game folder.
- Additionally you might have to add the launcher's temporary files directory (
%APPDATA%\YmirheimLauncher\Temp\System[3]) to the exclusions as well, since it's being used when it downloads the patches.
- Or pick a different anti-virus software. Among popular anti-virus solutions only Windows Defender causes such troubles.
- After that, perform file repair by clicking the "Repair Files" button in the launcher.
